If you’re building a WordPress site for clients, or any type of site that’s going to have multiple users (or both!), you need a foolproof way to control the exact permissions that each user has at the site.
For example, you probably don’t want to give a regular user access to install plugins, and I doubt you want to allow a non-technical client to edit theme files directly.
That’s why it’s important to control exactly what different users have to and which actions they can take. WordPress includes a system of user roles and capabilities.
In this post, I’ll first define those terms and go through the default roles and capabilities for every WordPress site. Then, I’ll show you how you can modify those default roles or create your own roles with custom capabilities for more control over your site.
What are WordPress Roles and Capabilities?
Let’s define user roles and capabilities.
A capability is a specific action that a user can take. These are all examples of individual capabilities:
- Publish post
- View a private post
- Edit a post
- Activate a plugin
- Install a theme
- Moderate comments
By default, WordPress includes 62 different capabilities covering all the core WordPress functionality.
A role, on the other hand, is a collection of capabilities that you can assign to an actual user account.
You can view this as a sort of hierarchy:
Each user account is assigned a role that defines a set of allowed capabilities.
The Default WordPress User Roles and Capabilities
By default, regular WordPress installs include five default roles:
- Administrator role
- Editor role
- Author role
- Contributor role
- Subscriber role
There’s also a sixth user role – Super Admin role – that only applies to WordPress Multisite installs.
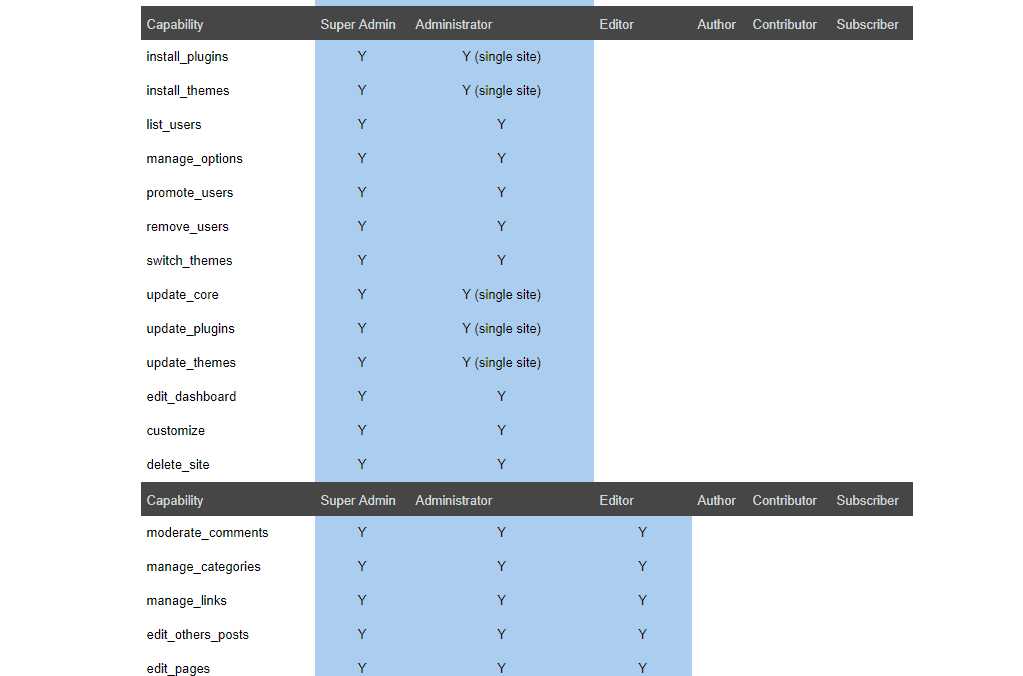
Additionally, WordPress includes the aforementioned 62 default capabilities to cover all the core WordPress functions.
You can see the full list of default capabilities, and which roles they’re assigned to, at the WordPress Codex Capability vs. Role Table:
Your Site Might Have More Roles and Capabilities
Beyond these defaults, some plugins will also create their own roles and/or capabilities.
For example, WooCommerce adds user roles for:
- Shop Manager
- Customer
As well as a number of associated capabilities for managing products, orders, etc.
Other plugins that add detailed functionality will likely have their own capabilities and, potentially, roles.
How to Set a User’s Role on Your WordPress Site
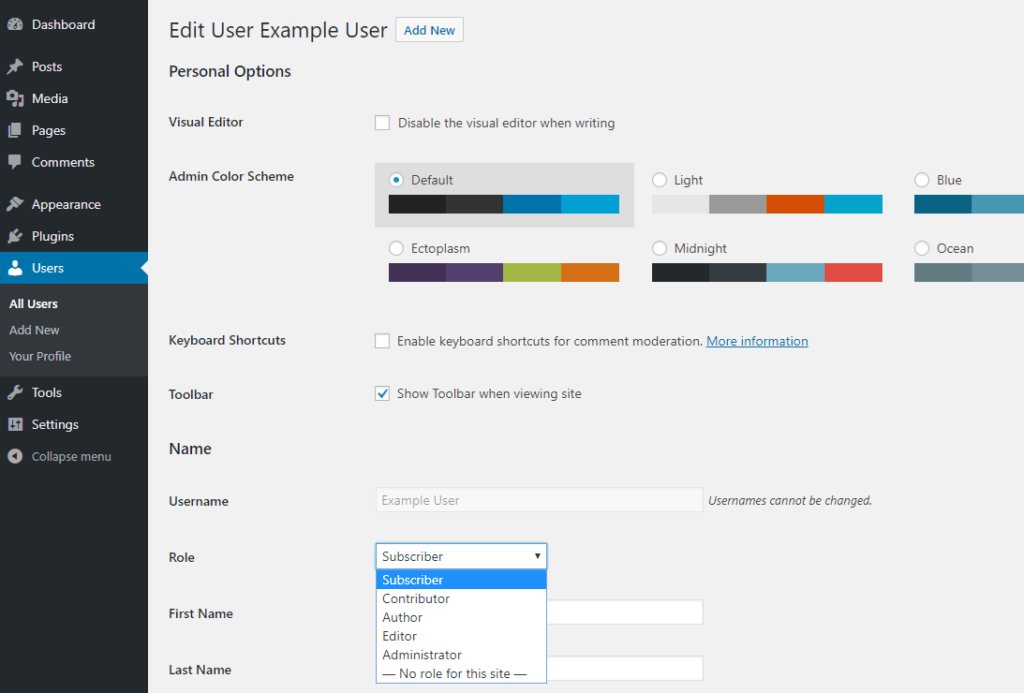
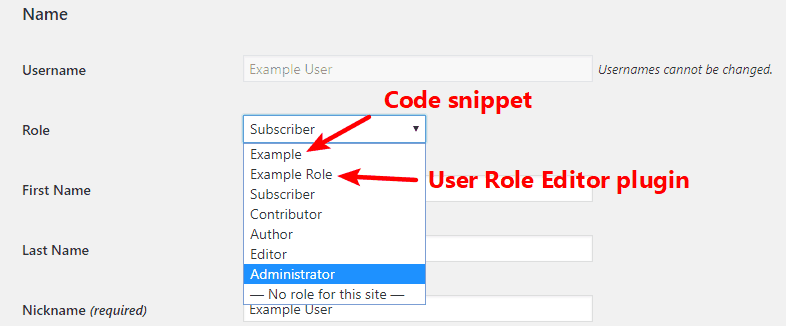
To edit a user’s role, click on the Users tab in your dashboard and edit the user you want to target.
Then, scroll down to the Role drop-down and select the user role that you want to apply to that user:
If you allow public registration, you can also change the default role that’s applied to new users at your site by going to Settings → General:

How to Create WordPress Roles and/or Edit Capabilities
Now that you know what roles and capabilities are, let’s get into how you can actually start manipulating roles and capabilities to create your own custom user access permissions.
As is the WordPress way, you can do this either using a plugin or with your own custom code.
I’ll start off with the plugin method because it’s a bit more accessible and flexible, but I’ll also show you how the code works later on.
Using User Role Editor to Manage Roles and Capabilities
User Role Editor is a popular free plugin that gives you a graphical interface to:
- Create new roles and custom user roles
- Edit the capabilities associated with any roles (including the default WordPress roles)
The plugin also lets you assign multiple user roles to a single user, as well as assign capabilities to specific user accounts, which opens up some interesting uses.
Once you install and activate the plugin, here’s how to actually use it:
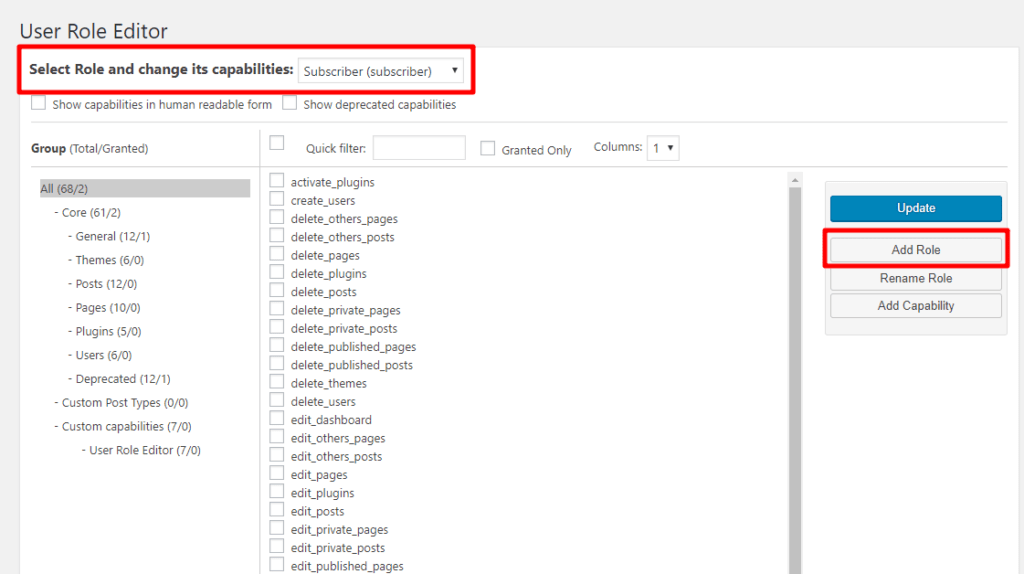
Step 1: Select the Role You Want to Edit (Or Create Your Own)
To access the plugin’s interface, go to Users → User Role Editor.
There, you can either:
- Select an existing role from the drop-down at the top
- Create a new role by clicking the Add Role button on the right
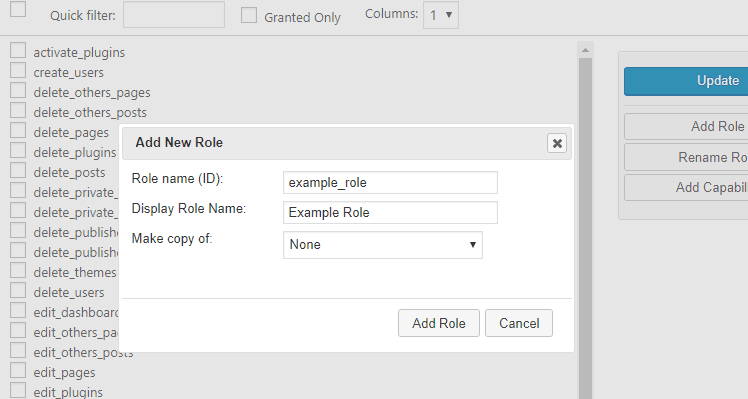
If you opt to create your own role, you’ll need to give it a:
- Role name (ID): all lowercase with no spaces or numbers.
- Display Role Name: can use regular text. This is what will appear in the Role drop-down when you edit a user.
You can also optionally choose to make a copy of the capabilities of an existing role. If you choose None, your new role will not have any capabilities to start.
Step 2: Add or Remove Capabilities for Role
Once you’ve selected the role that you want to edit, you just use the list of checkboxes to assign the capabilities you want that role to have access to.
A few tips for using this interface more effectively are:
- Show capabilities in human readable form makes it a little simpler to see what each capability actually does.
- The Group options on the left-hand side let you quickly skip to specific capabilities. If your plugins have added any capabilities, you’ll also see each plugin as a unique group.
- Granted Only lets you filter out only the capabilities that a role actually has access to.
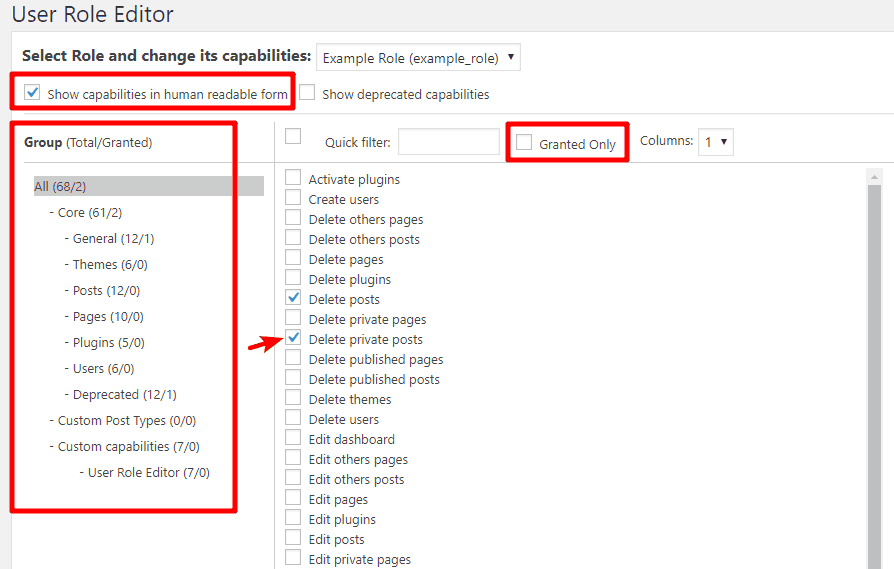
When you’re finished, make sure to hit Update.
Two Other Helpful User Role Editor Features
Beyond the core user role and capability management, User Role Editor also includes two other helpful features that you can access when you edit a user’s profile.
You can:
- Assign multiple roles to a single user account
- Edit capabilities on a per-user basis. This lets you control what a specific user has access to without the need to create a special role just for that user.
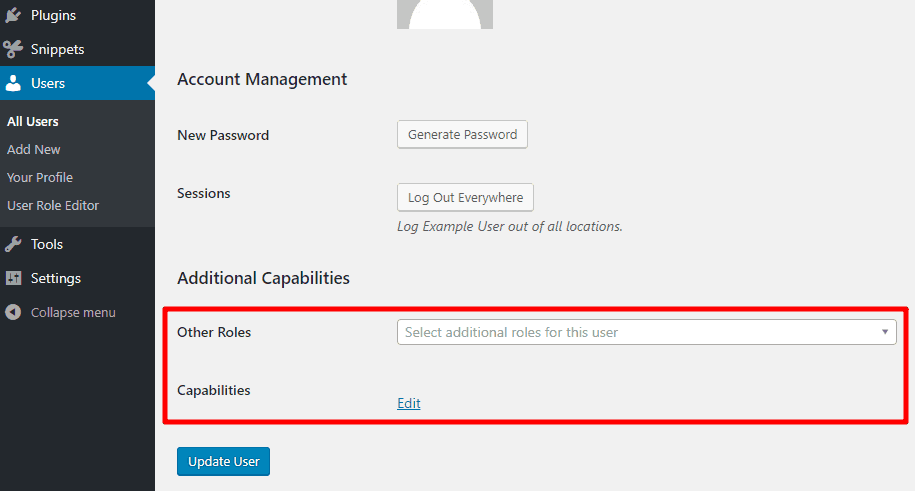
The second feature is especially helpful because it makes WordPress’ user permissions system more like Drupal’s system (a CMS which is usually considered to have more a more flexible user permissions system).
Using Code to Manage Roles and Capabilities
It’s also fairly simple, if a bit less user-friendly, to use your own code snippets to add new roles. This is your capability manager.
To do it, you:
- Register and add new role using the add_role function
- Define the capabilities assigned to that role using an array
I like to do this using a plugin like Code Snippets because it keeps everything clean, but you can also use the functions.php file of your child theme.
Here’s how it looks for a role named Example:
$result = add_role( 'example', __(
  'Example' ),
  array(
    'edit_posts' => true, // lets users edit their own posts
    'edit_pages' => true, // lets users edit pages
  )
);
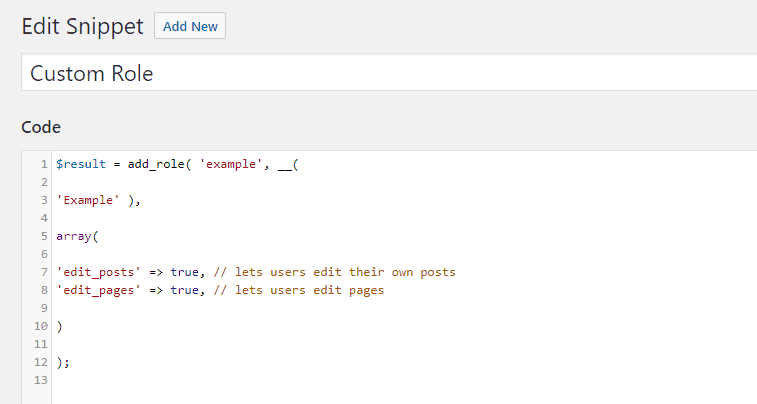
If you don’t define a capability in the array, it should default to false. But nevertheless, you’ll still see some developers explicitly set capabilities as false.
Once you save your snippet, you’ll be able to assign the new role to your users:
Actionable Tips for How to Use WordPress Roles and Capabilities
At this point, you should have a pretty good idea of how to create new user roles and manipulate roles/user capabilities on your WordPress site.
But you might still be wondering, “how does this knowledge actually help me build a better WordPress site?”
To that end, I want to leave you with some actionable tips.
Create a Custom Role for Your Client (For Client Sites)
If you’re building WordPress sites for clients, you should learn to love roles and capabilities.
You’ll likely want your client to have more capabilities than the default Editor role, but fewer capabilities than a full Administrator (WordPress admin role).
To do that, create a copy of the Administrator role but remove the capabilities that your client might…break something with.
For example, capabilities related to:
- Plugins
- Editing code
- Themes
There’s no strict rulebook here – go with whatever best fits your situation and your client’s knowledge level.
Give Certain Users Access to Private Content
WordPress includes core functionality to make posts, pages, and custom post types private. But, by default, only Administrators and Editors can see that private content.
By playing around with the capabilities for:
- read_private_posts
- read_private_pages
- read_private_products (on WooCommerce stores)
You can create lightweight private content without the need for a plugin.
Get More Control Over Multi-Author Blogs
If you’re running a multi-author blog, you’ll probably want to give users the Editor role so that they can help out with posts written by other users. But, by default, editors can manage pages in addition to posts.
You might not want that, which is why it can be helpful to create a more limited editor role that only has the capabilities to work with regular posts.
Wrapping Up WordPress Roles and Capabilities
WordPress roles and capabilities are an important part of what makes WordPress a full-fledged content management system, rather than a blogging system like the old days.
As the site owner, as soon as you master roles and capabilities, you’ll have pinpoint control over exactly what your clients or users have access to. And that means a more secure and well-functioning WordPress site!
If this seems to complicated for you, the team at GoWP can take care of managing your WordPress user roles and capabilities for you on the Unlimited Content Edits plan!
Interested in partnering with GoWP? We want to meet you!
Create a free partner account with GoWP and get free access to resources that will help you grow your agency. The GoWP Knowledgebase offers lead magnets, landing page templates, and more!
Learn from workshops, webinars, and exclusive interviews from the experts – and join in on a little Happiness Hour fun in the Digital Agency Owners Facebook Group, a highly vetted community of agency owners.